
Back to Accessibility home page
Headers and paragraphs
Tables
Images
Page numbering
Using the Accessibility Checker
Create meaningful hyperlinks
You can easily create accessible documents using Microsoft Word from the main toolbar.

Headings and paragraphs
Formatting should be applied using the formatting ribbon below:
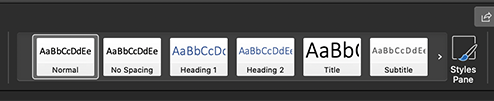
First create the title
Then use Heading 1
Heading 2 often follows next
Paragraphs can be used at any time
Watch a video offering advice on why headings are important
Tables
Designate a header row
There are multiple parts to the process of making a table accessible. The first involves making sure the table has a header row designated. The “Table Style Options” section of the ribbon on the Table Tools contextual tab lets you indicate that your data has a header row.

To add a table with a header row to a Word document:
- On the ribbon, click Insert, and then click Table.
- Choose how many rows and columns you want for your table.
- On the ribbon, in the “Table Tools” group, click Design.
- In the “Table Style Options” group, make sure Header Row is checked.
Column headings
Column headings help describe the content in a table, and should be present to help users understand the content.
To add column headings to a table in Word:
- Place your cursor in the first cell of the top row of the table.
- Type the name for the first column, and press Tab to move to the next column.
- Repeat step 2 for the remaining columns.
Repeat column headings
Column headings should be repeated at the top of a table if the table spans multiple pages.
To repeat the column headings:
- Right-click the table, and then click Table Properties.
- In the “Table Properties” dialog box, click the Row tab.
- In the “Options” group, make sure Repeat as header row at the top of each page is checked.
- Uncheck the box next to Allow row to break across pages.
- Click OK to accept the changes.
Alternative text
To add alternative text for tables, use the Alt Text tab of the “Table Properties” dialog box:

- Right-click the table, and then click Table Properties.
- In the “Table Properties” dialog box, click the Alt Text tab.
- Fill in the description for the table and, if necessary, add a title for the table.
- Click OK to accept the changes.
Watch a video on creating tables in Word
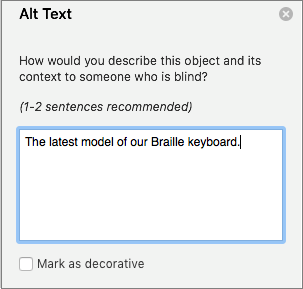
Add alt text to images
Add alt text to images, such as pictures, screenshots, icons, videos, graph’s and pie charts, so that screen readers can read the description to users who can’t see the image.
- Do one of the following:
- Select an image and press the Alt Text button in the Picture Format ribbon tab.
- Right-click an image and select Edit Alt Text.

The Alt Text pane opens on the right side of the document body.
- Type 1 – 2 sentences to describe the image content and context.
Watch a video on how to add alt text to images
Page numbering
Use automated page numbering in the header or footer in Word. Do not manually put in page numbers yourself. If you are using a Table of Contents then that can automatically be synchronised with the page numbers.
Use the Accessibility Checker
Microsoft products have a built-in accessibility checker which can help the document author test the overall accessibility of the document. The checker provides Inspection Results, feedback about the importance of each item, and tips on how to repair issues.

Watch a video about using the Accessibility Checker
Use lists
Lists should be created using Word’s built-in tools for ordered (numbered) and unordered (bulleted) lists. Without using these tools, a list is not really a list, which makes the content more difficult for screen reader users to fully understand.

Create meaningful hyperlinks
- Copy the link you want to work with into a Word document and turn it into a hyperlink.
Note: Someone using a screen reader to access this link will hear one character read aloud at a time, which is difficult to understand. - Select the whole URL, including the “http” at the beginning and the domain at the end.
- Right-click to open the context menu, then find and select Edit Hyperlink.
- In the dialog box, look for a text box labeled Text to display. Type in the description text you want.
- Click OK.